FAQ
Installation
Wordpress 3.0 or higher
PHP version 5.2 or higher
- Download the plugin in the .zip format here
- In admin panel click on Plugins. Then click on Add New.
- Select Upload method and upload the plugin.
- The plugin is installed. Now you need to activate the plugin and enter your Amazon Associate api keys in the settings screen.
If you having troubles installing plugin check if your site meets minimum requirements. WP Bounce works on Wordpress 3.0 or higher on servers with php version 5.2 or higher.
If your site meets these requirements and you still unable to install it - email us at support [ at ] wpbounce.com with details about any errors you see and your site address and we will try to help you.
Settings
If you need to disable all pop ups temporarily you don't have to deactivate plugin. Instead just select "disable" and you can re-enable it any time.
In order to use the plugin you will need to have two accounts: Amazon Associates account and Product Advertising API account. Both are free to register.
- Amazon Associates account can be registered here: https://affiliate-program.amazon.com/
If you already have your affiliate account set up login and in the top left screen you will see your Associate Tag. For US market it usually looks like this someword-20. See screenshots below for guidance.
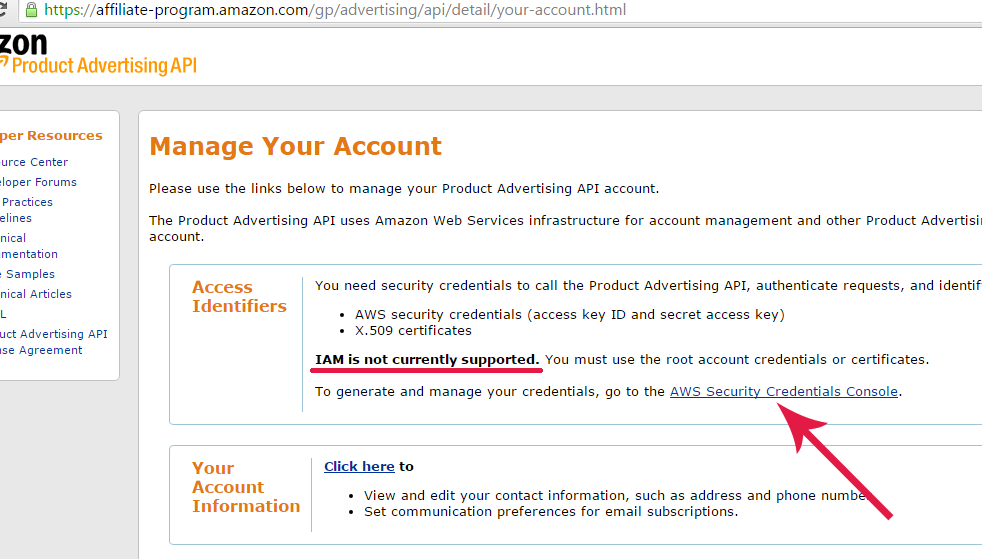
- You will also need account at Product Advertising API. You can sign up for it here: https://affiliate-program.amazon.com/gp/advertising/api/detail/main.html
Important Update 2015
Some time ago Amazon introduced a new service for managing credentials called IAM (short for Identity and Access Management).
IAM is not currently supported for Product Advertising API. You must use the root account credentials.
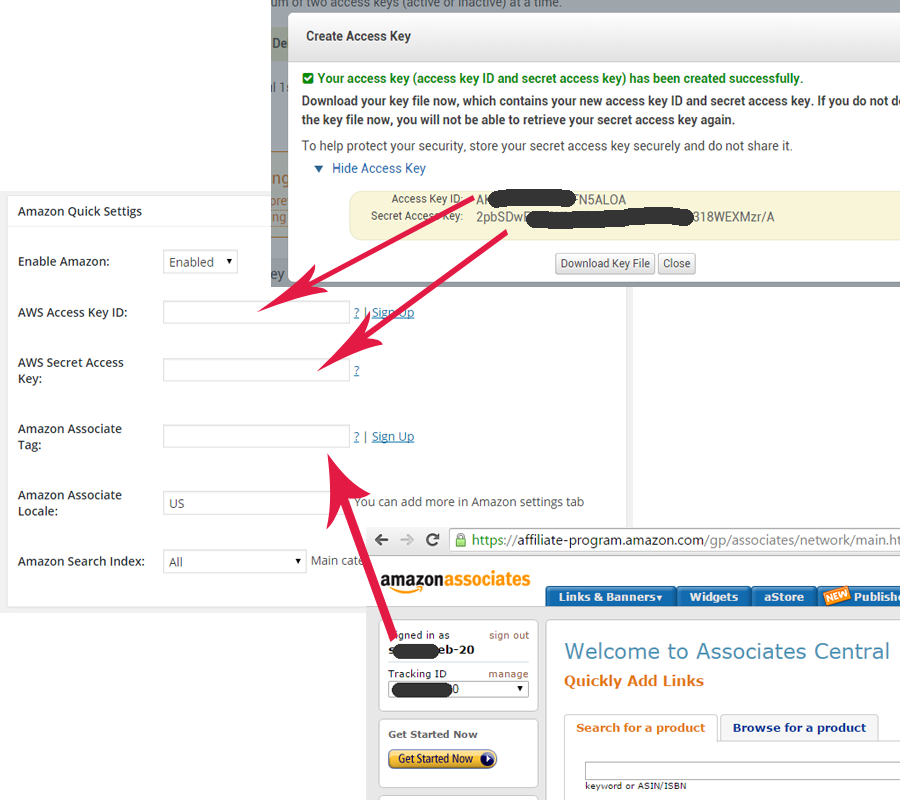
See screenshots below (click them to enlarge):Use the link in your dashboard to access your AWS keys.
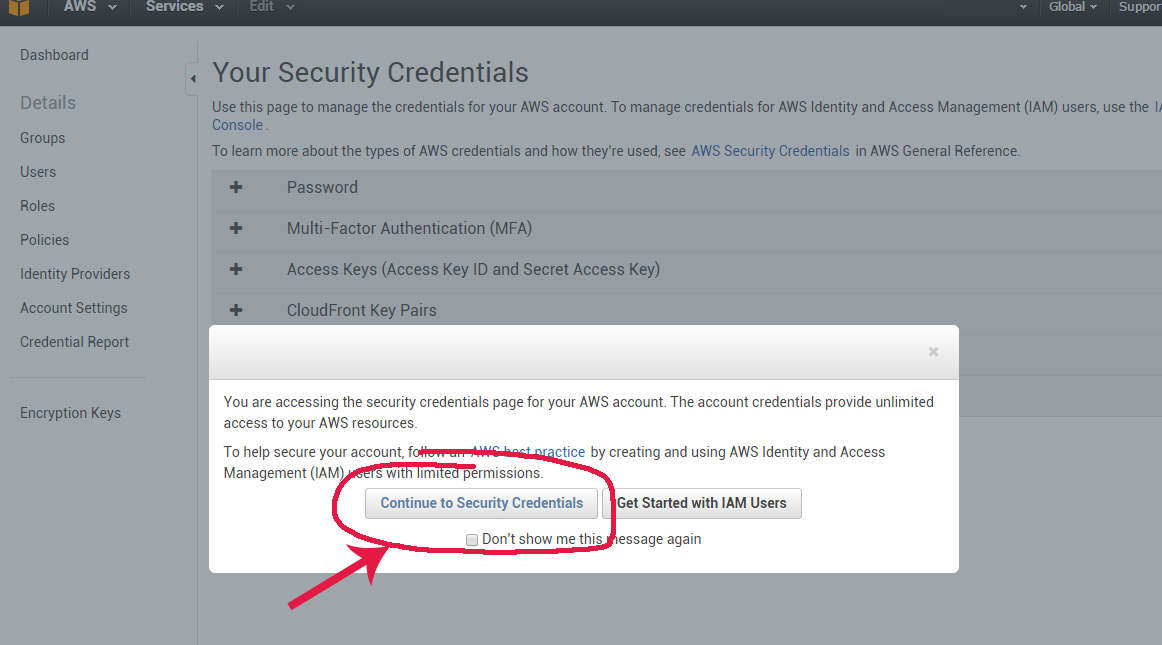
When you first login to your AWS Security Credentials Console you will be presented with a message.
You DON NOT need to create IAM User. Click the button "Continue to Security Credentials".You can only see your secret access keys for your AWS root account one time when you create it.
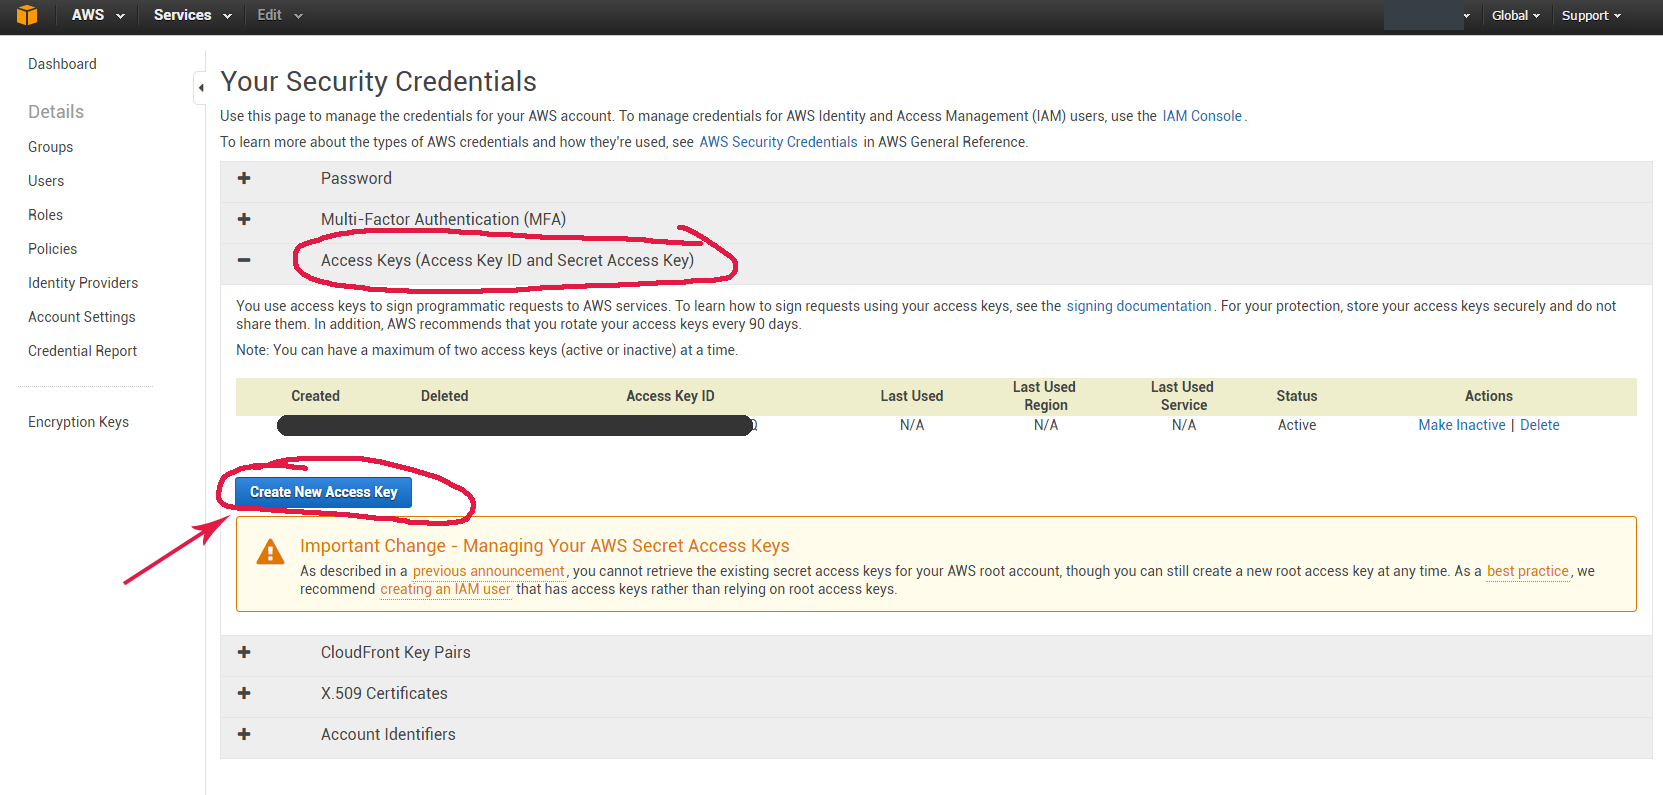
Click "Access Keys (Access Key ID and Secret Access Key)" tab to expand it.
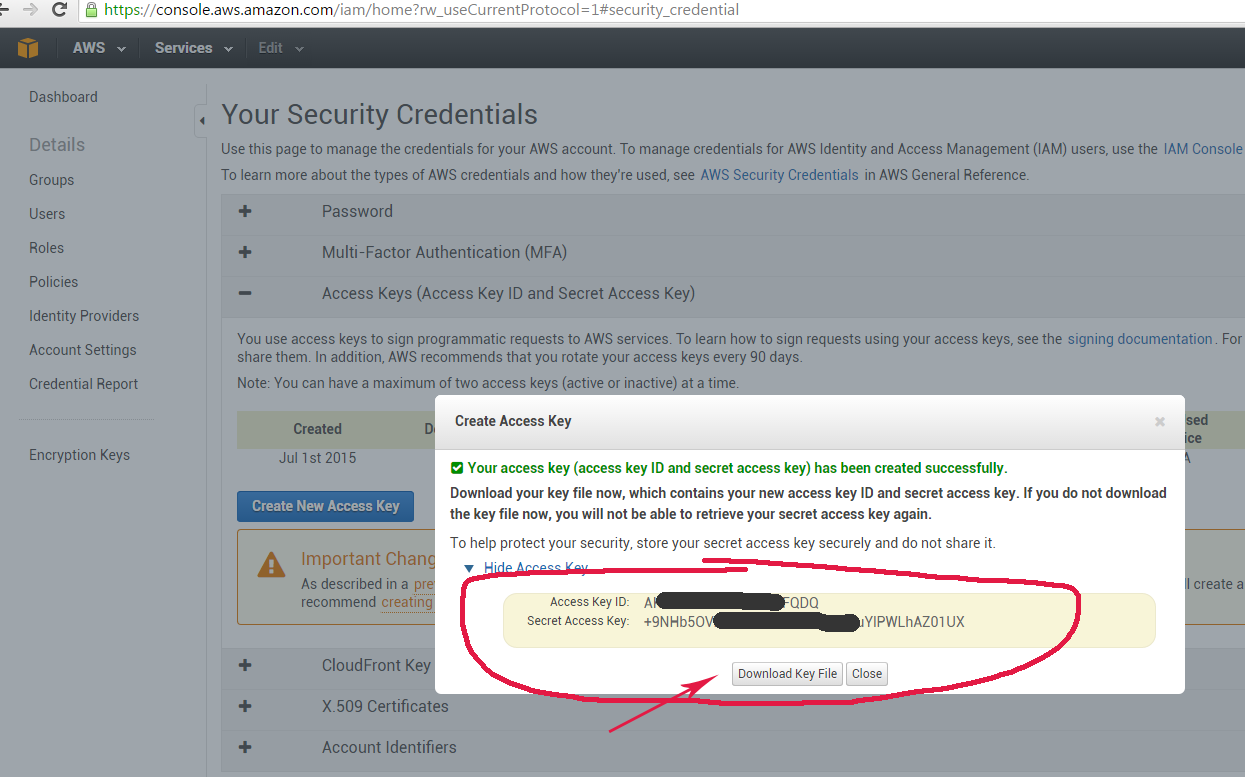
Then click "Create New Access Key" button.Copy your Access Key ID and Secret Access Key. Or download Key File using the button in the pop up.
Use the diagram below to figure out where to place each credential in your plugin settings.
If you have any questions you can contact me here
To help serving more relevant ads you can choose product category to pull results from. For example if your site is about baseball you can select SportingGoods there.
If you want to show pop ups to visitors directly coming from search engines only check this to Yes.
Scenario:
User A found your page on google and lands on your page with pop ups enabled. If the user decides to go back the pop up is triggered.
User B got on your site through a different page (from typing in your url or from a different page (without pop up) found in google) clicks on a page with pops enabled. In this case the ad is not being triggered because the user is not SERP direct referral.
If you don't want to show pop ups to users that are registered on your wordpress site and are logged in check this to No.
The plugin creates an invisible layer at the top of your page. It is 100% wide and 10px tall.
If you have important links at the very top 10px of your pages they sometimes can be covered by this layer and be clickable only after the ad has been popped. If this is an issue for your site you can try lower number here but the sensitivity of a pop trigger can suffer.
You can select what post types you want to use the plugin on.
We tested this plugin with other post types. If you use WP Ecommerce plugin and wish to use the pop ups on for example product pages you can do so by checking them on this screen.
Maximum total pops that can be triggered per visitor on any given day.
You can choose to display pop up ads on all posts/pages by default or you can choose to show ads only on posts/pages you check on edit post screen.
This is the message that is shown on the pop up lightbox window above the actual products.
This is font size in pixels of a message that goes above the products in the lightbox window.
Delayed Pop is a lightbox window ad that gets triggered after certain amount of seconds spent on a page regardless of intentions to go back.
In order for the WP Bounce to function properly your theme footer.php must have this tag:
<?php wp_footer(); ?>
This tag is very important for the wordpress site. All themes must have it in their footer.php just before the closing </body> tag or else it breaks many plugins.
How To Fix
- In your wordpress admin panel go to Appearance -> Editor and click on footer.php in the list of files on the right.
- Find </body> tag and right before it copy and paste this:
<?php wp_footer(); ?>
Note: Backup your files before making this change. If you have any firewall plugins disable them before making changes.
If you would like to learn why it is important to have <?php wp_footer(); ?> tag in your theme check function reference here.
There are six different ways the plugin can pick keywords for a post. These keywords will be used to pull relevant products from Amazon.
The plugin will try every selected method in the same order as presented on the settings screen until at least one keyword is generated.
Tweak these settings to achieve the best relevancy.
Pick up search engine keywords
If user arrived from search engine plugin can pick up keywords used for search and use them to pull products. This method will be used only if referring url is available. If user arrived from ssl encrypted url ( https:// ) the keywords cannot be picked up (for example this happens when user is logged in to any google services).
Generate based on post/page content
Plugin scans post content and picks most used words and phrases.
Use post title
If title is 4 words or less the plugin will use it to pull products. If nothing found the plugin will try each word individually until at least one result found.
Use post tags
You can use this method if you have good tags on your posts.
Use specific keywords per category
If you enter keywords per category they can be used to pull products.
Use fallback keywords
If all selected methods above fail use these keywords to pull products. You need to enter your fallback products first.
To get the best relevancy it is recommended to exclude some "garbage" words.
Example: keyword nikon camera will return better results than keyword cheap nikon camera review
You can enter any word or words combination here. It will strip the word in any position of the keyword text. For example if you enter word review the plugin will remove that word from any keyword containing it:
cheap nikon camera review will turn into cheap nikon camera,
review nikon camera cheap turns to nikon camera cheap
nikon camera review cheap becomes nikon camera cheap
If you want to exclude the whole word or phrase from being used as keyword (exact match) put them in double quotes: "keyword to exclude"
To exclude partial text string use * (star sign) on either side of the text string. For example to strip the word mutli from the beginning of a keyword enter: multi*
Keywords are not case sensitive. Keyword will remove Keyword, keyword, KEYWORD, KeyWord etc.
This keyword source option is for advanced users only.
You can use your own php function to generate keywords used for product lookups.
To use this option you must have a function in your functions.php file that looks like this:
function wpbounce_custom_keyword_source($advertiser = FALSE, $post_id = 0)
{
$my_custom_kws = array('keyword one', 'keyword two');
return $my_custom_kws;
}
The plugin will pass $advertiser and $post_id
$advertiser - can either be amzn for Amazon or epn for eBay ePN add-on.